Week 10 - More Kubernetes
Welcome to week 10. Now you should have a working 1 replica Deployment of your application that you have tested with port-forwarding.
In this lab we'll cover exposing the app to the world through Kubernetes Service and Ingress. The applications' database should move to a separate pod. In accordance with Kubernetes statelessness practices, the environment variables should be saved to Secret and ConfigMap resources separately from the Deployment.
It is a strong suggestion to go through the Kubernetes lecture slides as theory is covered more thoroughly there than in this lab guide.
Development requirements
There are no new development requirements this week. Ensure all features from previous phases continue to work as expected after deploying your application to Kubernetes.
Operations requirements
Below you will find new operational requirements to implement. These requirements focus on production-ready Kubernetes deployments and CI/CD automation.
Kubernetes Services and Ingress
Danger
DO NOT try to install an Ingress controller (not to mix up with object Ingress that you do have to create) in your namespace. This is not possible and not allowed in our student cluster. We have provided a centrally installed Ingress controller for you.
Last week we showed you how to access your deployed pod by forwarding the exposed port to your local computer. This gives easy and statically configurable access to your application for short term testing.
But Kubernetes is designed to allow pods to be replaced dynamically, as needed. This means that pod IP addresses are not durable, they can change after Deployment restart.
This brings us to Services. A Service identifies its member Pods with a selector. For a pod to be a member of the Service, the Pod must have all the labels specified in the selector.
There are different types of Services, we are going to cover two of them here: NodePort and ClusterIP.
ClusterIP exposes the Service on a cluster-internal IP address. This means that the ClusterIP makes the Service only reachable within the cluster. This is good for connecting different services inside your namespace, for example enabling communication between database and application pods. ClusterIP alone does not enable external access to your application.
NodePort exposes the service on each Kubernetes node's IP at a static port (the NodePort). Traffic that reaches any node's IP address at the specified port gets forwarded to the respective service and the pods that are the member of this service. This is good for testing external access, but then the client trying to reach the application should have the ability to access arbitrary ports on the Kubernetes host nodes. This is not very secure or comfortable for web applications.
Complete
- Create a Service to expose your application.
- The Service should use an appropriate type.
Now, for testing, you can use port-forwarding again by forwarding the Service port. But the application is still not accessible from the world through a web address. To expose the app to the world you should use a Kubernetes resource called Ingress.
An Ingress is an intelligent Load Balancer. It Exposes HTTP and HTTPS routes from outside the cluster to Services within the cluster. This does not expose arbitrary ports or protocol. The Ingress concept lets you map traffic to different backends based on rules you define via the Kubernetes API. It can also be configured to give Services URL-s and to terminate SSL / TLS.
For host address use the name <your-app-name>.kubernetes.devops.cs.ut.ee. If you use some other format or suffix, the Ingress won't work.
Complete
- Create an Ingress to route external traffic to your application.
TLS certificates
Danger
DO NOT try to install operators in your namespace. This is not possible and not allowed in our student cluster. Operators can only be installed by cluster administrators.
We have set up an operator called cert-manager. An Operator is a controller that automates the management of complex applications in Kubernetes. The cert-manager creates TLS certificates for workloads in the Kubernetes cluster. It also renews the certificates before they expire. The operator has been configured to attain the certificates from ACME Let's Encrypt issuer.
Complete
- TLS certificates must be automatically provisioned for your Ingress.
- Use cert-manager to automate certificate creation and renewal.
- Add the appropriate annotation to your Ingress resource to trigger cert-manager.
- Your application should be accessible via HTTPS.
Hint
Examples in lecture slides.
Database Deployment
It is time to move your database to a separate container and then to a separate Resource on Kubernetes. It is your choice if you deploy a standalone Deployment of your database or use an Operator to set up a replicated database. We have installed the CloudNativePG operator on Kubernetes that provides PostgreSQL database. We currently have no other database operators available.
Deploying the database separately (and replicated) will give your application more resilience against Pod restarts. At the moment you are not required to run a replicated database, but it might be good to plan for the future. A replicated database contributes towards the application being stateless in Kubernetes.
Danger
DO NOT try to install operators in your namespace. This is not possible and not allowed in our student cluster. Operators can only be installed by cluster administrators.
Here is an example manifest for using CNPG operator PostgreSQL cluster.
apiVersion: postgresql.cnpg.io/v1
kind: Cluster
metadata:
  name: postgresql-cluster
  namespace: <your-team-namespace>
spec:
  instances: 2
  bootstrap:
    initdb:
      database: appDB
      owner: app
      secret:
        name: app-secret
  storage:
    size: 1Gi
This manifest creates a new empty PostgreSQL database. Figure out what the secret here should contain. Apply it with the kubectl apply -f <filename>.yaml command.
When setting up other types of database try finding guides that set up a StatefulSet object for the database. For example, like this MongoDB guide.
For storage, you can use the emptyDir option at the moment. This means that the storage isn't persistent, we'll cover persistent data solutions like Longhorn next week. Use the minimal size (up to 400Mi) for emptyDir.
Complete
- Deploy your database as a separate resource from your application on Kubernetes.
- One replica is enough for now.
- Use emptyDir for storage.
Hint
If you have trouble connecting to your database setup service from your application pod look into how to use NetworkPolicies. There is also an example in the lecture slides.
Here are the operators currently installed in the student Kuberntes cluster:
| Operator | Purpose | Examples | Implementation Notes |
|---|---|---|---|
| CloudNativePG | Operator for starting a PostgreSQL cluster | • Basic Example • Full Example | Straightforward HA setup. |
| mariadb-operator | Operator for starting a MariaDB cluster | • Basic Provisioning • Full Manifest | Warning: Automatic primary failover requires extra configuration. |
| minio-operator | Operator for starting a Minio cluster (S3) | • Tiny Tenant (Basic) • Full Base Config | Note: The tiny tenant example relies on Kustomize. You must run kubectl kustomize to render the configuration. |
If you need something else, let us know, we can install it for you.
Configuration management
There are resources called Secret and ConfigMap on Kubernetes for managing configuration data. They can be mounted into a container as a configmap volume or secret volume. Larger datasets (images, videos etc) should use a different storage device (like emptyDir this week).
Complete
- All environment variables must be stored in Kubernetes ConfigMaps.
- No hardcoded values should exist in your application code or deployment manifests.
- All sensitive information (passwords, tokens, connection strings) must be stored in Kubernetes Secrets.
- No secrets should be committed to your GitLab repository or visible in your CI/CD pipeline logs.
- Your application deployment should reference ConfigMaps and Secrets. There are different ways to do this in the Deployment / StatefulSet manifest.
- The Secret and ConfigMap objects should still be deployed from your CI/CD pipeline.
- Use manifest files to populate the Kubernetes ConfigMap.
- Use GitLab secrets to populate the Kubernetes Secret.
This implementation offers the ability to store configuration externally and inject it when the container runs. This means that it is easier to make changes to the variables - you don't have to modify the image, just change the values stored in the resources. Configuration management resources are read-only for containers but editable for a Kubernetes user. Changes made in ConfigMaps and Secrets are propagated to connected containers.
GitLab-Kubernetes integration
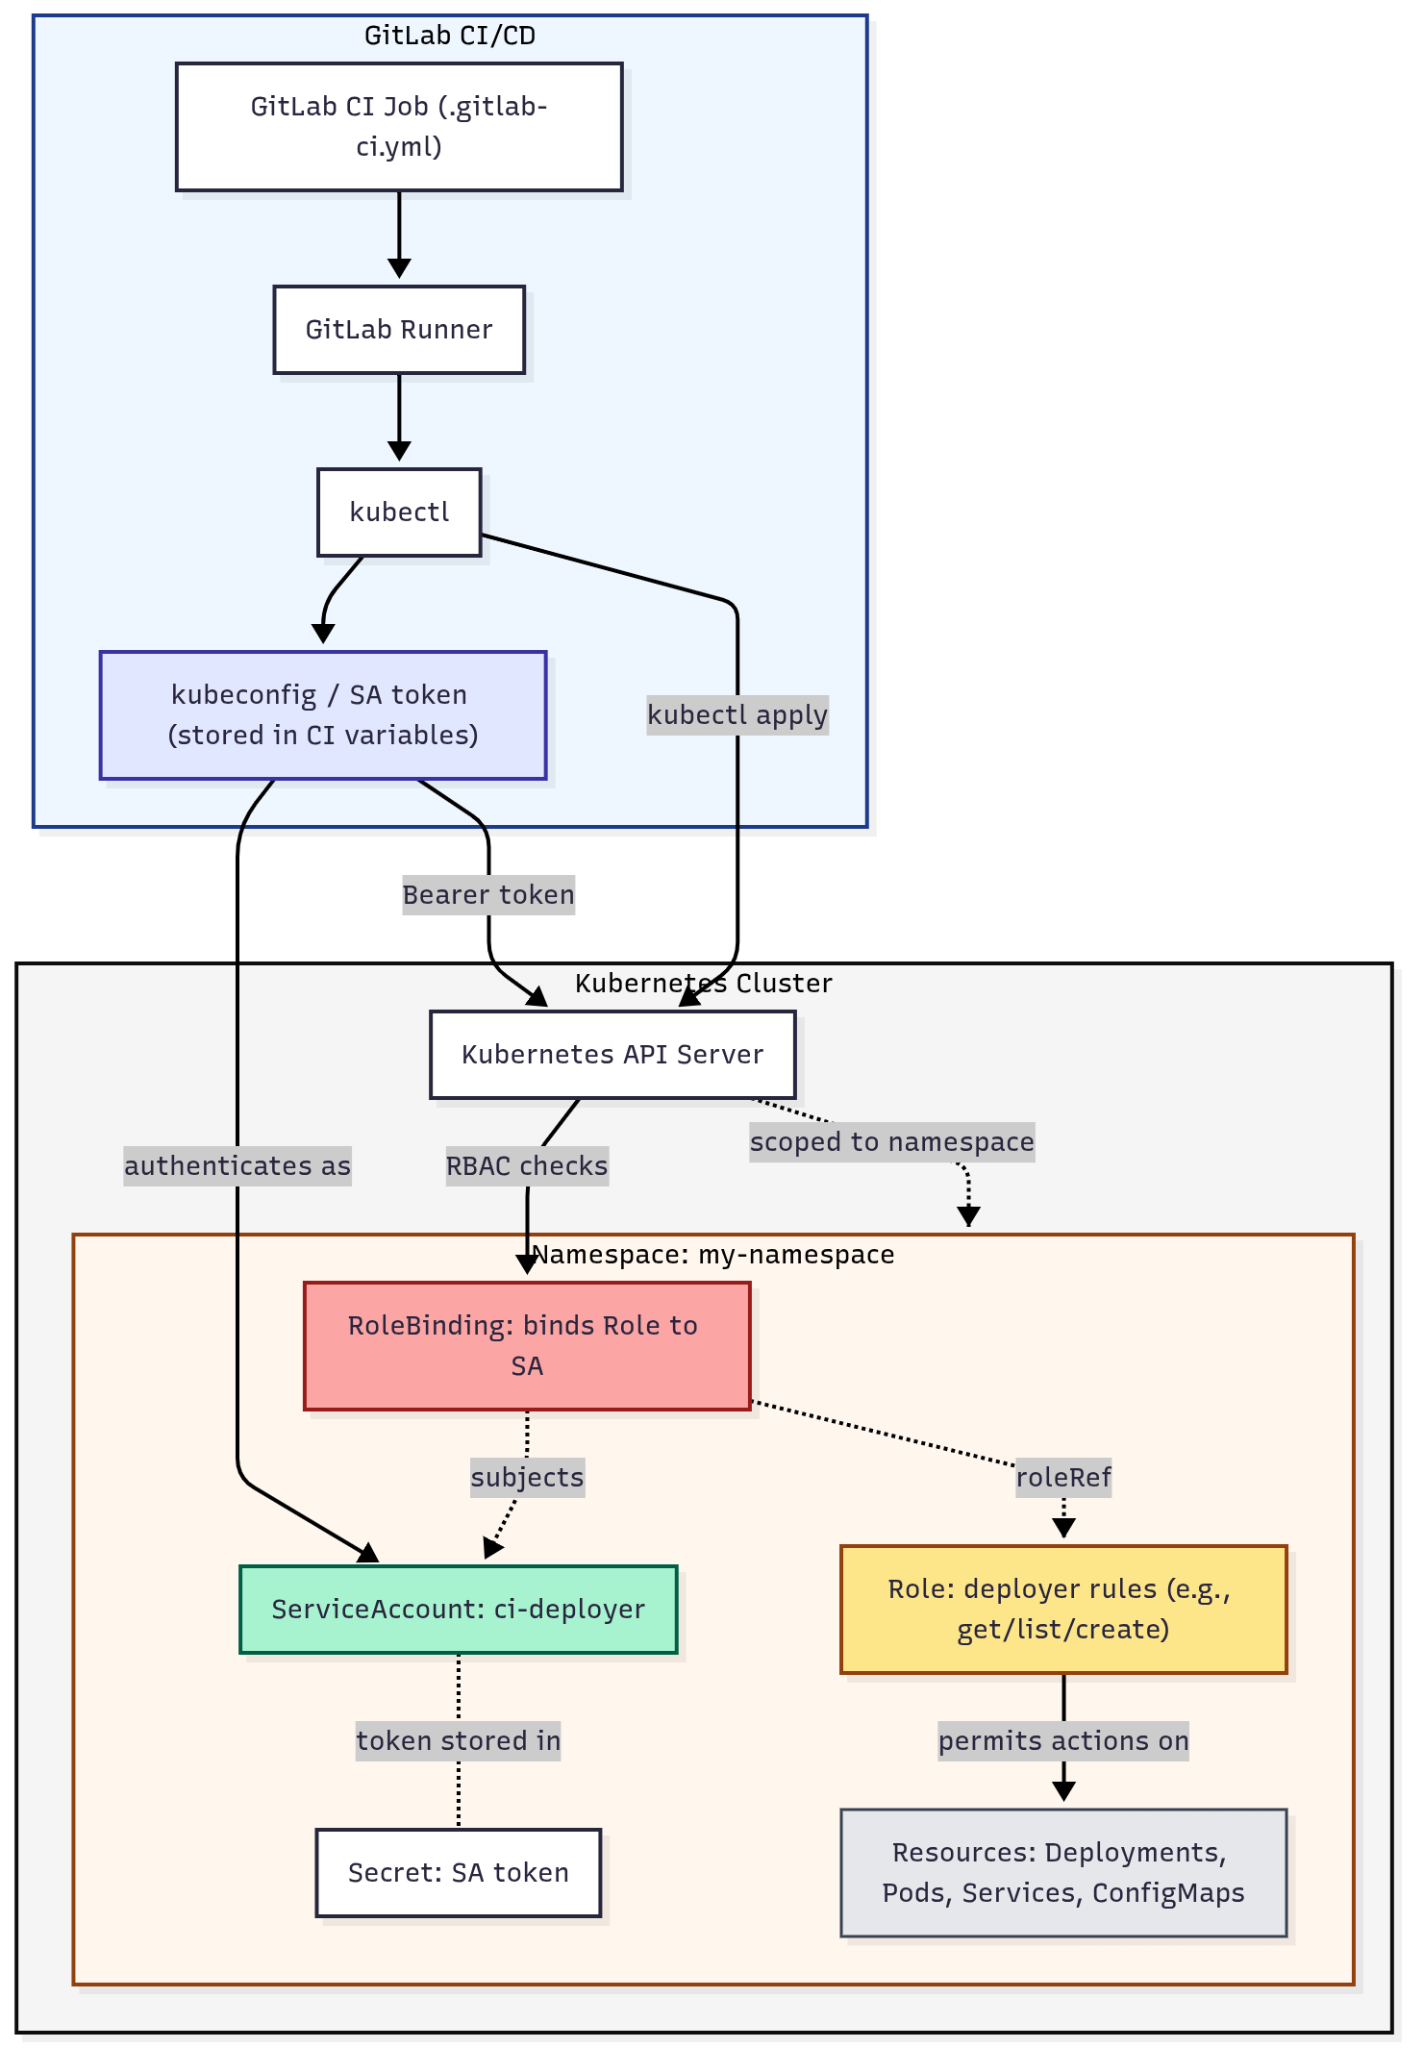
There are some extra steps to enable GitLab to manage resources inside your Kubernetes namespace through the CI/CD pipeline. You need to use Role-Based Access Control (RBAC) authentication. RBAC refers to the idea of assigning permissions to users based on their role within an organization. It offers a simple, manageable approach to access management that is less prone to error than assigning permissions to users individually.
In Kubernetes this is implemented through resources called ServiceAccount, Role and RoleBinding. The Role defines a set of permissions within a specific namespace. It describes which API resources and actions are allowed. The RoleBinding connects a Role to a ServiceAccount (or User). It Grants the ServiceAccount the permissions defined in the Role. And finally the ServiceAccount provides an identity for a process like the GitLab CI/CD pipeline runner. This will allow the GitLab repository pipeline runner to deploy new cluster objects.
Here is an example of ServiceAccount, Role and Rolebinding objects, that follow a sensible least-privilege option:
apiVersion: v1
kind: ServiceAccount
metadata:
  name: cicd-serviceaccount
  namespace: <namespace>
---
apiVersion: v1
kind: Secret
metadata:
  name: cicd-serviceaccount-token
  namespace: <namespace>
  annotations:
    kubernetes.io/service-account.name: cicd-serviceaccount
type: kubernetes.io/service-account-token
---
apiVersion: rbac.authorization.k8s.io/v1
kind: Role
metadata:
  name: cicd-serviceaccount-role
  namespace: <namespace>
rules:
- apiGroups: [""]
  resources: ["pods", "pods/log", "configmaps", "secrets"]               # does not include Services
  verbs: ["get", "list", "watch", "create", "update", "patch", "delete"]
- apiGroups: ["apps", "extensions"]
  resources: ["deployments", "replicasets", "statefulsets"]
  verbs: ["get", "list", "watch", "create", "update", "patch", "delete"]
---
apiVersion: rbac.authorization.k8s.io/v1
kind: RoleBinding
metadata:
  name: cicd-serviceaccount-rolebinding
  namespace: <namespace>
roleRef:
  apiGroup: rbac.authorization.k8s.io
  kind: Role
  name: cicd-serviceaccount-role
subjects:
- kind: ServiceAccount
  name: cicd-serviceaccount
  namespace: <namespace>
This manifest also includes a kubernetes.io/service-account-token type Secret that later will be used for generating KUBECONFIG for the GitLab pipeline.
Kubernetes deployment inside the CI/CD
Danger
Do not use your personal account or credentials for deploying resources with the GitLab CI/CD pipeline!
Now that a ServiceAccount has been made, there's one more step - crafting the KUBECONFIG file for that ServiceAccount, which should be inserted into the CI/CD pipeline as credentials. Sadly, this process is slightly convoluted with just kubectl. You can run a bash script to generate the KUBECONFIG:
# Define variables for namespace, service account, secret names
NAMESPACE=<namespace>
SERVICE_ACCOUNT_NAME=cicd-serviceaccount
SECRET_NAME=cicd-serviceaccount-token

# Extract the token, CA data, and API server from the secret
TOKEN=$(kubectl get secret $SECRET_NAME -n $NAMESPACE -o jsonpath='{.data.token}' | base64 --decode)
CA_DATA=$(kubectl get secret $SECRET_NAME -n $NAMESPACE -o jsonpath='{.data.ca\.crt}')
API_SERVER=$(kubectl config view --minify -o jsonpath='{.clusters[0].cluster.server}')

# Generate the KUBECONFIG file
cat <<EOF > ${SERVICE_ACCOUNT_NAME}-kubeconfig
apiVersion: v1
kind: Config
clusters:
- name: user@kubernetes
  cluster:
    certificate-authority-data: $CA_DATA
    server: $API_SERVER
contexts:
- name: user@kubernetes-${SERVICE_ACCOUNT_NAME}
  context:
    cluster: user@kubernetes
    namespace: $NAMESPACE
    user: $SERVICE_ACCOUNT_NAME
current-context: user@kubernetes-${SERVICE_ACCOUNT_NAME}
users:
- name: $SERVICE_ACCOUNT_NAME
  user:
    token: $TOKEN
EOF

echo "KUBECONFIG file created: ${SERVICE_ACCOUNT_NAME}-kubeconfig"
This process can be simplified with other tools, like Lens or kubectl-view-serviceaccount-kubeconfig-plugin, which make the process of getting the KUBECONFIG file much more straightforward.
Now that the CI/CD pipeline has credentials for deploying to the Kubernetes cluster, you can use the kubectl command in your pipeline to deploy resources to the cluster.
Complete
Automate deployment of Kubernetes resources to the cluster by creating a deploy stage in your GitLab CI/CD pipeline.
Container images and private registries
Last week you built images in CI and pushed them to your GitLab project registry. This week we are going to start deploying the images that you built using your pipeline to Kubernetes.
How a Pod gets its image
When a Pod is scheduled onto a node, the kubelet on that node pulls the image. Neither you nor your CI pipeline pulls it. This means:
- A public image needs no credentials.
- A private image (like the ones in your GitLab registry) needs credentials the kubelet can use. They come from a Secret of type
kubernetes.io/dockerconfigjson, referenced in the Pod spec underimagePullSecrets. - If the credentials are missing or wrong, the Pod shows
ErrImagePulland thenImagePullBackOff. Kubernetes keeps retrying with growing delays. The actual error from the registry is visible withkubectl describe pod <pod-name>, under Events.
GitLab registry credentials: push vs. pull
Two different identities talk to your project's registry:
| Who | What | Credentials |
|---|---|---|
| CI job | pushes images | CI_REGISTRY, CI_REGISTRY_USER, CI_REGISTRY_PASSWORD, created automatically for each job and valid only while that job runs |
| kubelet | pulls images | a deploy token with only the read_registry scope, long-lived, not tied to any person |
Don't use your personal access token or password for pulling. Everyone who can read the Secret in your namespace could use it as you, and it stops working when you leave the team.
Complete
Create a deploy token for your project (Settings → Repository → Deploy tokens) with only the read_registry scope. Store the username and token somewhere safe, for example as masked GitLab CI/CD variables.
Create the pull secret in your namespace:
kubectl create secret docker-registry gitlab-registry \
  --docker-server=<registry-host> \
  --docker-username=<deploy-token-username> \
  --docker-password=<deploy-token> \
  -n <your-team-namespace>
Find the registry host
If you don't know the <registry-host>, then looking at the container registry's CLI Commands (Deploy → Container Registry → CLI Commands) drop-down can be a useful hint.
Then reference it in every Pod template that uses a private image:
spec:
  template:
    spec:
      imagePullSecrets:
        - name: gitlab-registry
      containers:
        - name: backend
          image: <registry-host>/<group>/<project>/backend:<tag>
You can also attach the pull secret once to the ServiceAccount your Pods run as. Every Pod using that ServiceAccount then gets it automatically:
kubectl patch serviceaccount default -n <your-team-namespace> \
  -p '{"imagePullSecrets": [{"name": "gitlab-registry"}]}'
Complete
Make sure all your Deployments pull from your private GitLab registry with the deploy-token pull secret. No public images of your own application, and no personal credentials.
Tagging images
Tag every image with something unique and traceable, such as $CI_COMMIT_SHORT_SHA or a version number. Avoid latest:
- You can't tell which version is running.
- A rollback has nothing to go back to.
- With
latest, Kubernetes pulls on every Pod start. A simple Pod restart can silently run a different version than before.
Building images without root
Last week you had to implement a pipeline job to build images and push them to your project's GitLab container registry. If you haven't done this already then here are some examples of how it's done.
Warning
Kaniko was archived by Google in 2025. Don't use it for new pipelines.
GitLab's documented replacement for Kaniko:
build-backend:
  stage: build
  image:
    name: moby/buildkit:rootless
    entrypoint: [""]           # otherwise the image starts the daemon and the job hangs
  variables:
    BUILDKITD_FLAGS: --oci-worker-no-process-sandbox   # lets BuildKit run unprivileged
  before_script:               # rootless builds don't log in to the registry for you
    - mkdir -p ~/.docker
    - |
      cat > ~/.docker/config.json <<EOF
      {"auths": {"$CI_REGISTRY": {"username": "$CI_REGISTRY_USER",
                                  "password": "$CI_REGISTRY_PASSWORD"}}}
      EOF
  script:
    - |
      buildctl-daemonless.sh build --frontend dockerfile.v0 \
        --local context=. --local dockerfile=. \
        --output type=image,name=$CI_REGISTRY_IMAGE/backend:$CI_COMMIT_SHORT_SHA,push=true
Use this if the runner's seccomp/AppArmor settings block BuildKit:
build-backend:
  stage: build
  image: quay.io/buildah/stable
  variables:
    STORAGE_DRIVER: vfs
    BUILDAH_ISOLATION: chroot
  script:
    - echo "$CI_REGISTRY_PASSWORD" | buildah login -u "$CI_REGISTRY_USER" --password-stdin "$CI_REGISTRY"
    - buildah build -t "$CI_REGISTRY_IMAGE/backend:$CI_COMMIT_SHORT_SHA" .
    - buildah push "$CI_REGISTRY_IMAGE/backend:$CI_COMMIT_SHORT_SHA"
Complete
Your image build jobs must not use Docker-in-Docker or privileged containers. Use rootless BuildKit or Buildah, and tag images with a unique, traceable tag.
Why not to use docker build
docker build needs a Docker daemon running as root. In CI that means Docker-in-Docker inside a privileged container. A privileged container can take over the runner's host, along with every other team's job on it. Use a daemonless, rootless builder instead. It reads the same Containerfile and produces the same OCI image, without privileges.
Troubleshooting image pulls
ErrImagePull/ImagePullBackOff: runkubectl describe podand read the Events.unauthorized: the pull secret is missing, isn't referenced inimagePullSecrets, or the deploy token lacksread_registry.not found: wrong image path or tag. Compare with the image list in Deploy → Container registry in GitLab.- The secret exists but isn't used: check that it is in the same namespace as the Pod.
Documentation requirements
What we expect your documentation to include?
Kubernetes architecture
- What is your high-level Kubernetes architecture (Services, Ingress, Deployments)?
- Include a diagram or description of how traffic flows through your infrastructure.
Configuration management
- What environment variables are stored in ConfigMaps?
- What sensitive data is stored in Secrets?
CI/CD pipeline
- How does your Kubernetes deployment stage work?
Tasks
- Create Kubernetes Service and Ingress resources for your application.
- Configure TLS certificates using cert-manager annotations.
- Separate database and app deployments.
- You can use the available CNPG operator.
- You can deploy the database yourself in a separate Deployment.
- One database replica is enough, for now...
- Set up GitLab <-> Kubernetes integration.
- Create a ServiceAccount, Secret, Role, and RoleBinding in Kubernetes.
- Add the
kubeconfigto GitLab CI/CD variables.
- Move all environment variables to ConfigMaps and all secrets to Secrets.
- Remove any hardcoded values from your code and manifests.
- Ensure no secrets are committed to GitLab or exposed in pipeline logs.
- Add a deployment stage to your GitLab CI/CD pipeline.
- Automate the deployment of your application to Kubernetes.
- Document how images are built.
- Which builder did you use and why.
- How are images named and tagged.
- Document how Kubernetes authenticates to your registry and how you handle the necessary secrets.
- Keep phasing out all VM-related deployment configurations and processes.